
Site Data Entry
Site Data Entry is the screen where you build the physical structure of the project and mark what has been done in each room.
1. What it is for
Site Data Entry is the screen where you build the physical structure of the project and mark what has been done in each room. You divide the site into four levels — block, unit, room and the production items in that room — then mark each production item as Not done, In progress or Done.
Everything the app knows about progress starts here. The percentage on the project card, the completion ratio on Overview and every breakdown in the Production Report count the production items marked on this screen. Progress payments are fed from here too: once a production item is Done and tied to a contract, it appears among the subcontractor's billable items.
This is the daily screen for the site manager and the site engineer; the office side reads the results in reports.
2. Opening it, and who can see it
In the sidebar, Site Operations › Site Data Entry.
| Your permission | What you can do |
|---|---|
| View | You read every list and every production item card. Status appears on the card as a badge; it cannot be changed. The add, edit, delete, reorder and Import controls are not drawn at all |
| Edit | You can add blocks, units, rooms and production items, rename them, delete them, drag them into order and change status |
| No permission | The module appears dimmed and locked in the menu |
3. Anatomy of the screen
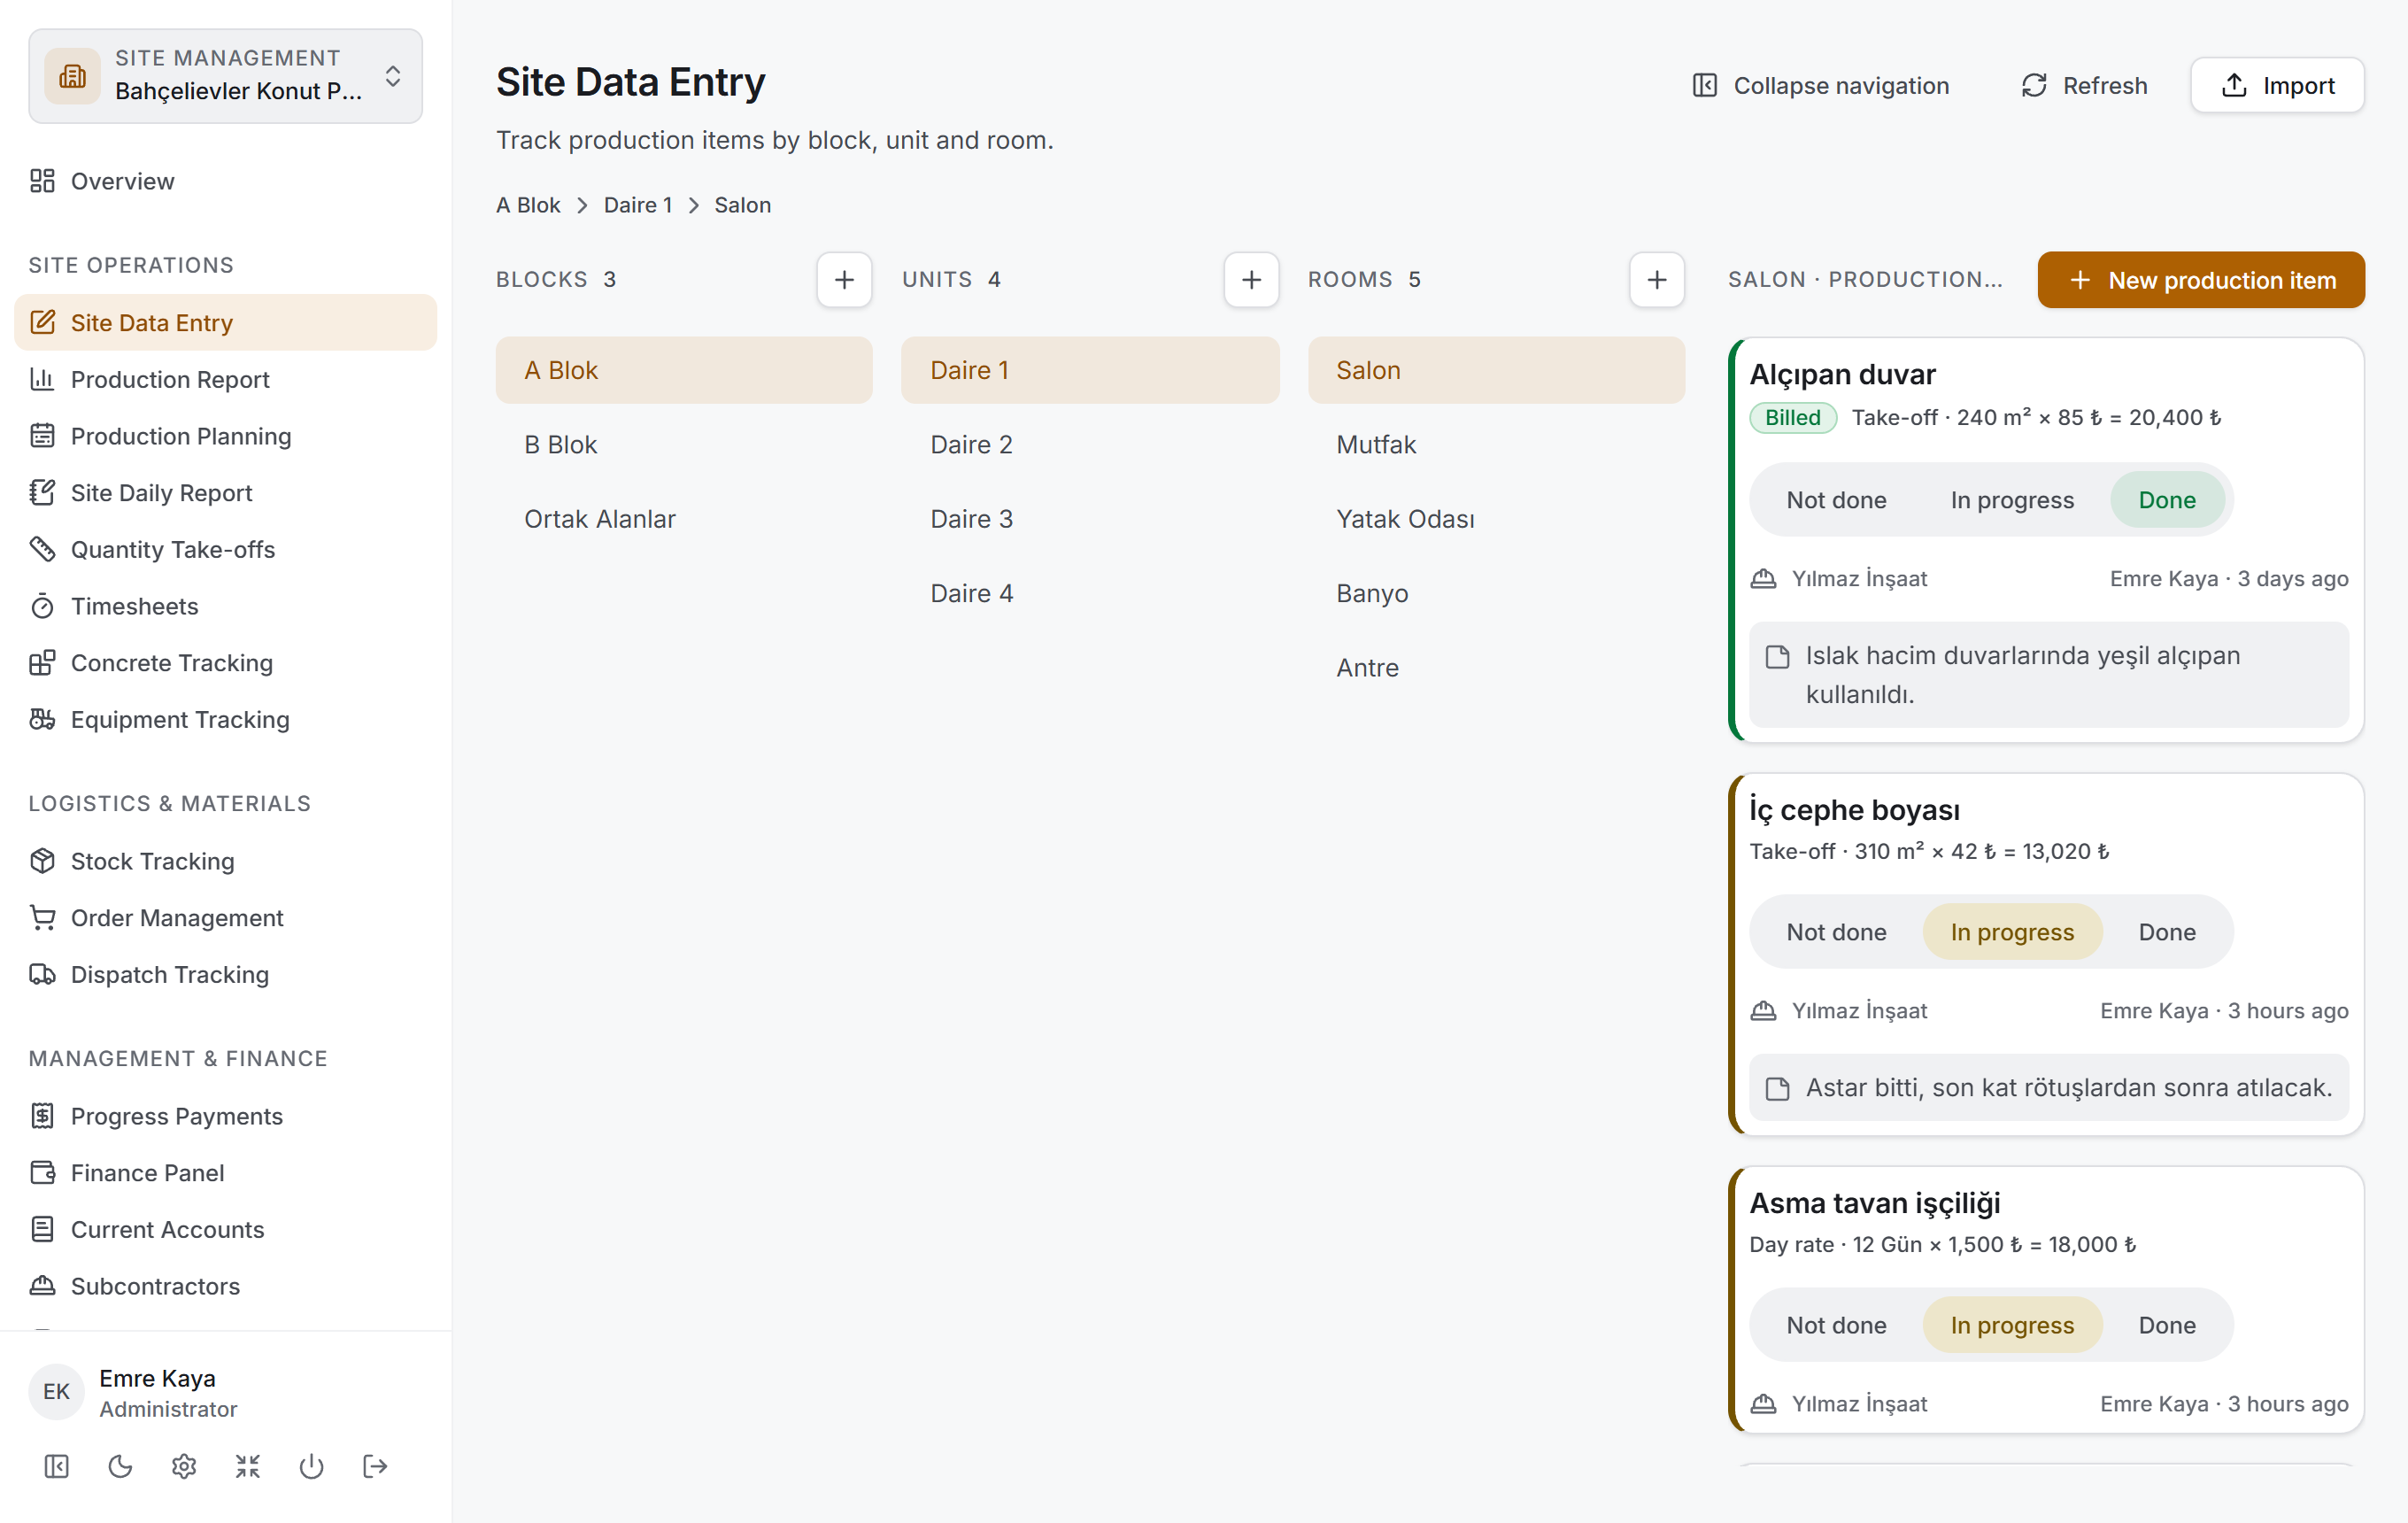
The page has two halves. Three narrow navigation columns on the left, and the production item area filling the rest on the right. The split is deliberate: the three columns on the left are there to write an address, the work happens on the right.
Heading and buttons
The heading is Site Data Entry and the line under it reads "Track production items by block, unit and room." Three buttons sit on the right:
| Button | What it does |
|---|---|
| Collapse navigation | Hides the three columns completely; the production item area is centred and widens. While hidden the button reads Show navigation |
| Refresh | Reads every list from the server again |
| Import | Opens the bulk production item entry window. Drawn only if you have edit permission |
The trail
The thin line under the heading writes the currently selected path as Block › Unit › Room. When nothing is selected it reads "Select a block on the left to get started."
That line is the only location indicator on the page while navigation is collapsed; it stays when navigation is open too, because reading three levels on one line is faster than scanning three columns.
The navigation columns
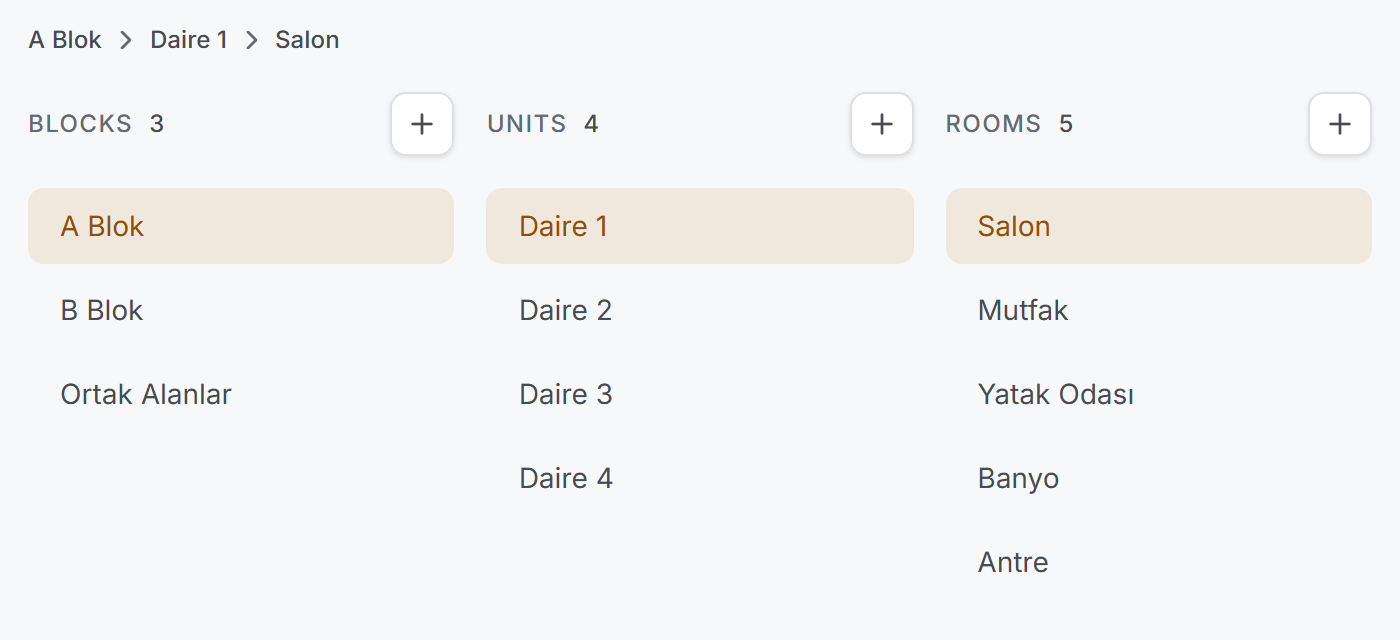
All three columns are laid out the same way: the plural name of the level in small caps at the top (Blocks, Units, Rooms) with the record count beside it, the add button on the right, the list below.
The record you click in a column is highlighted and the column to its right shows what is under it. Changing the block drops the unit and room selection; changing the unit drops the room selection.
A column can say four different things:
| What you see | What it means |
|---|---|
| Grey placeholder rows | The list is coming from the server |
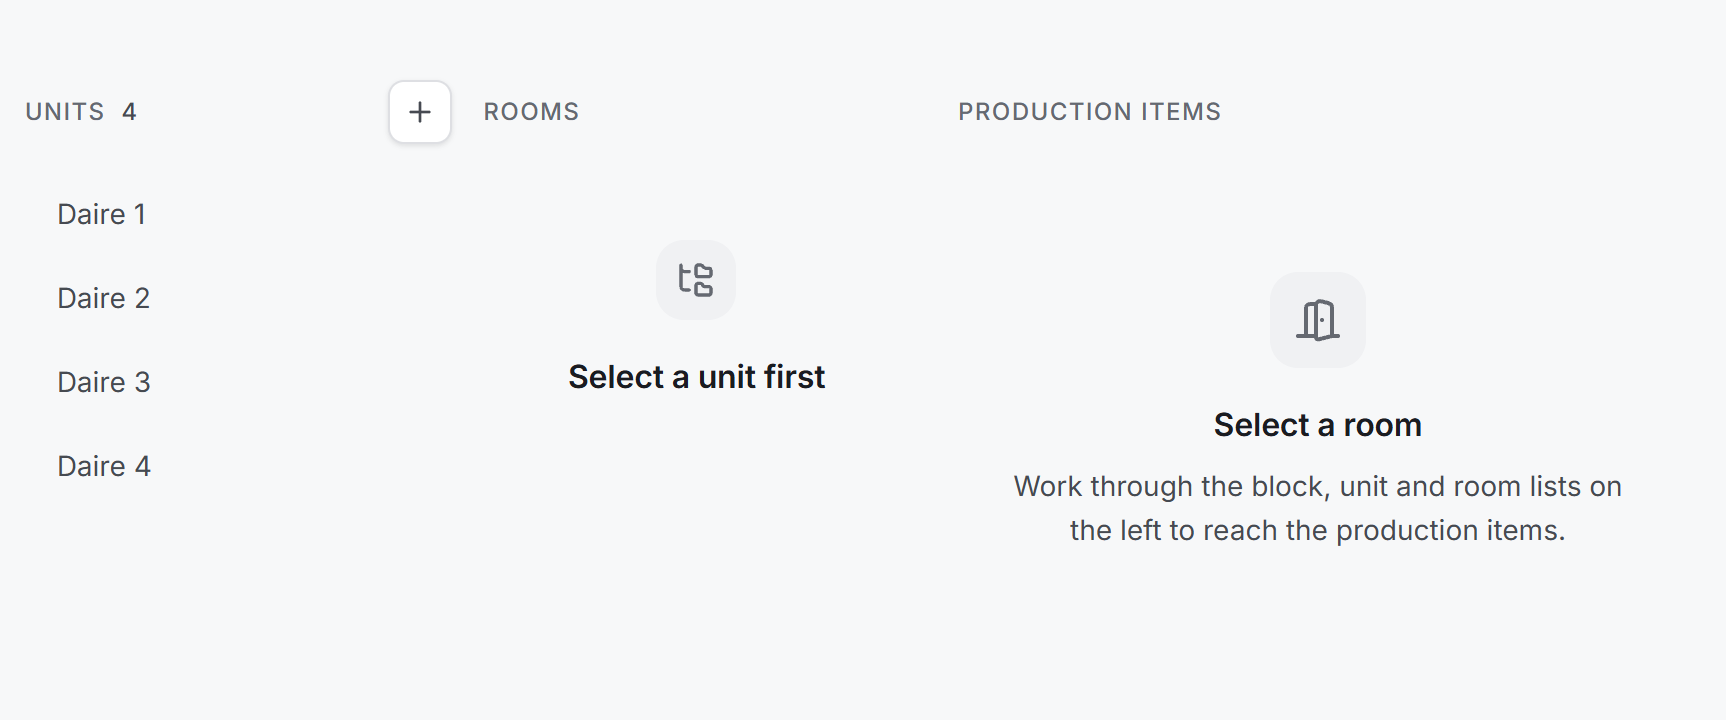
| Select a block first / Select a unit first | You have not selected a record at the level above |
| No blocks yet (the same for units and rooms) | The level above is selected but there is nothing under it |
| The list could not be read | The server could not be reached. Below it: "Once you are connected, try again with Refresh." |
When a column holds more than eight records, a search box appears under the heading. It does not appear below that: in a project with three blocks a search box narrows nothing, it only clutters the screen. If the search matches nothing, it says No matching records.
The production item area
The heading of the right-hand section is Production items until a room is chosen and Room name · Production items afterwards, with the card count beside it. The New production item button sits on the right and is only drawn while a room is selected.
With no room selected, the area says Select a room and, below it, "Work through the block, unit and room lists on the left to reach the production items." If the room is selected but empty, No production items in this room appears and you can add one straight from there.
The production item list gets a search box after eight cards as well. This box searches the production item name and its note.
The production item card
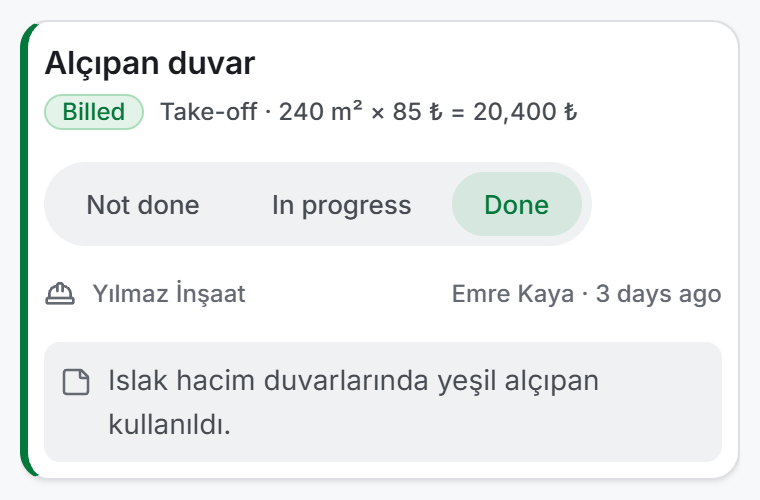
The card carries three bands and, when all of them are filled, shows this:
Top band — name and status. The name of the production item on the left, with the payment summary under it if there is one. Beside it the status control: a three-segment switch — Not done, In progress, Done. The active segment takes the colour of the status and the left edge of the card is painted in the same colour. The edge stripe is for scanning the list from a distance, the segment colour for looking at the card up close.
In a wide window the control sits to the right of the name; when the production item area narrows (which is the default while navigation is open) it drops under the name by itself.
If the production item has a photo, a Photo button sits in the right-hand group as well.
The payment summary takes three forms depending on the source:
| Payment source | What the card reads |
|---|---|
| Take-off | Take-off · 240 m² × 85 ₺ = 20,400 ₺ |
| Day rate | Day rate · 12 Gün × 1,500 ₺ = 18,000 ₺ |
| Lump-sum contract | Lump-sum contract · 12,500 ₺ — no quantity, a price |
| Not chosen | The line is not drawn at all |
If the contract has no unit price, no multiplication is done and only the quantity is written. Multiplying by zero and writing "= 0 ₺" would show a production item whose contract has not been entered yet as having no value.
If the production item has been added to a progress payment, a green Billed badge appears at the start of the summary. Not being added is the default state of every new production item, and a default is not worth a badge.
Middle band — who and when. The subcontractor's company name on the left, the person who last touched the record and when on the right.
Bottom band — the note. If one was entered, the production item note in a grey well. Line breaks are kept.
4. Fields
Block, unit, room
All three levels have a single field: the name. There is nothing else to enter; you set the order of the records by dragging them in the list.
| Field | What it means | Required |
|---|---|---|
| Block Name | The largest division of the site. e.g. Block A | Yes |
| Unit Name | The independent unit under the block. e.g. Unit 3 | Yes |
| Room Name | The space inside the unit. e.g. Living room | Yes |
| Template to copy | Copies an existing record together with its sub-records. Only asked when creating a new record | No |
The production item
| Field | What it means | Required |
|---|---|---|
| Production Item Name | The work being done. This name appears in the list and in every report. e.g. Plasterboard wall | Yes |
| Subcontractor | The company doing the work. Chosen among the subcontractors registered in this project | No |
| Payment source | The contract form the work will be paid under: Take-off, Lump-sum contract, Day rate or None / not applicable | No |
| Contract | One of the chosen subcontractor's agreements that matches the chosen source. The unit price is read from it | No |
| Quantity source | Only asked for take-offs: Enter manually or Choose from a saved take-off | — |
| Take-off Quantity | The quantity of work done. Use a comma or a full stop for decimals; do not type a thousands separator | No |
| Number of Day Rates | On a day rate this is what the quantity is called, and its unit is Gün (day) | No |
| Unit of Measure | The unit of the quantity. Chosen from the preset list or typed by hand | No |
| Notes | Free text. Appears on the card and in the search box | No |
| Status | Not done, In progress, Done. A new production item starts as Not done | — |
The payment source shapes the form
The source you choose decides which of the fields below it are asked:
| Source | What is asked |
|---|---|
| None / not applicable | Nothing. The production item is just a work item; it never reaches a progress payment |
| Take-off | Contract · quantity source · quantity + unit |
| Day rate | Contract · number of days. The unit box is not drawn at all; it is fixed to Gün |
| Lump-sum contract | The contract only. No quantity is asked |
Preset units
The unit box suggests eight ready values: m · m² · m³ · mtül · adet · kg · ton · Gün. The list is not a constraint; you can type units that come up on site, such as paket or takım, by hand.
5. Step by step
5.1 Getting down to a room
- Choose a block from the Blocks column on the left.
- Choose a unit from the Units column that opens.
- Choose the room from the Rooms column.
The area on the right shows that room's production items; the trail writes the full path.
5.2 Adding a block, unit or room
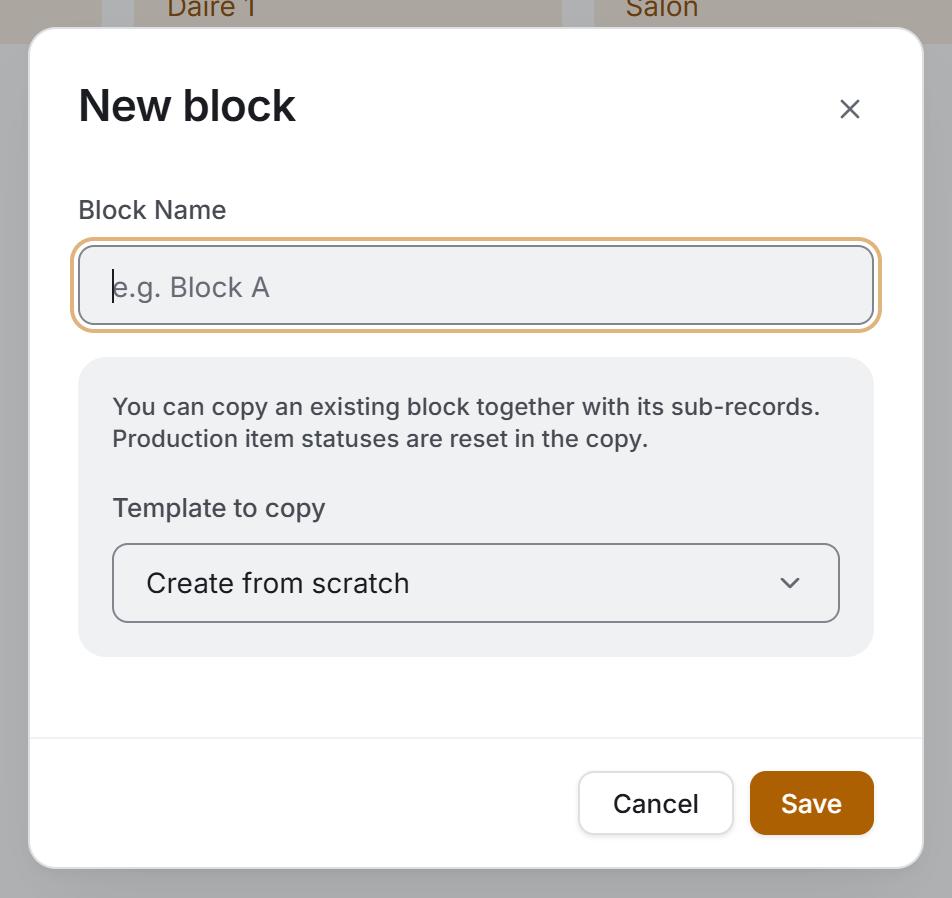
- Press the plus button in the heading of the column concerned. For units and rooms a record must be selected at the level above first; otherwise the button is not drawn.
- Type the name into the window that opens.
- If you want to build it from scratch, press Save.
The record is added to the end of the list.
5.3 Copying a record from a template
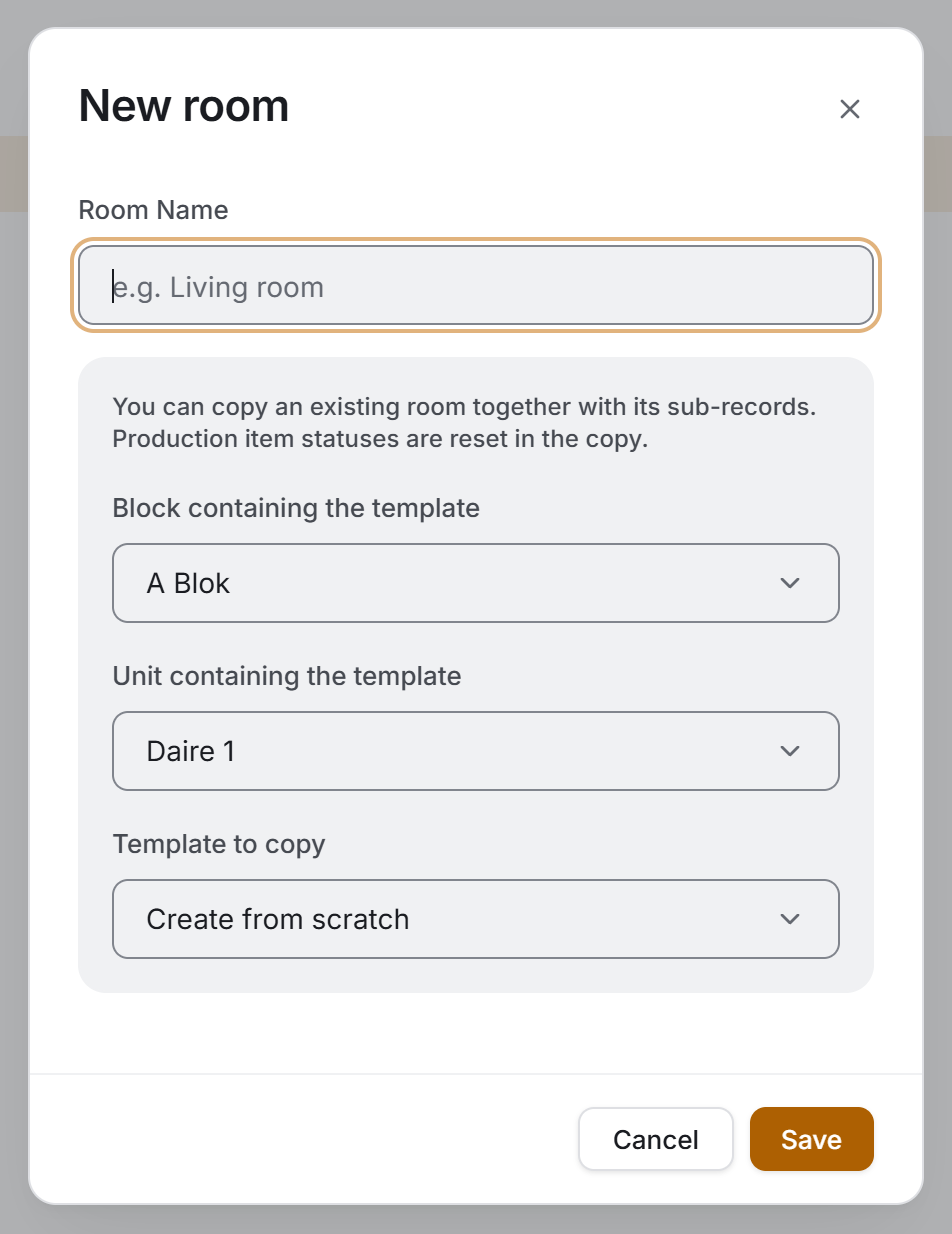
This is the feature of the page that does the most work. In a block of forty flats, entering the rooms of every flat and the production item list of every room by hand takes days; one flat is built and copied thirty-nine times.
- Open the new record window and type the name.
- In the box below, choose which block (and, when copying a room, which unit) the record to be copied sits under. The boxes open with the path selected on screen.
- Choose the source from the Template to copy box.
- Press Save.
Every level and production item under the source is copied. In the copy the following are reset:
- The status of every production item becomes Not done.
- The person who last touched the record is cleared.
- Progress payment links are cleared — the copy is tied to no progress payment.
- The saved take-off link is not copied. Tying the same take-off to two production items would open the way to billing it twice. The quantity and the unit are copied, the link is not.
Copying proceeds level by level on the server; for a large flat it can take a few seconds. Wait until the window closes.
5.4 Renaming
- Right-click the record in the list.
- Choose Rename.
- Type the new name and press Save.
Renaming only changes the name; the record keeps its place in the list.
5.5 Changing the order
You can change a row's or a production item card's place in the list by dragging it. The new order is written to the server and looks the same for everyone.
5.6 Adding a production item
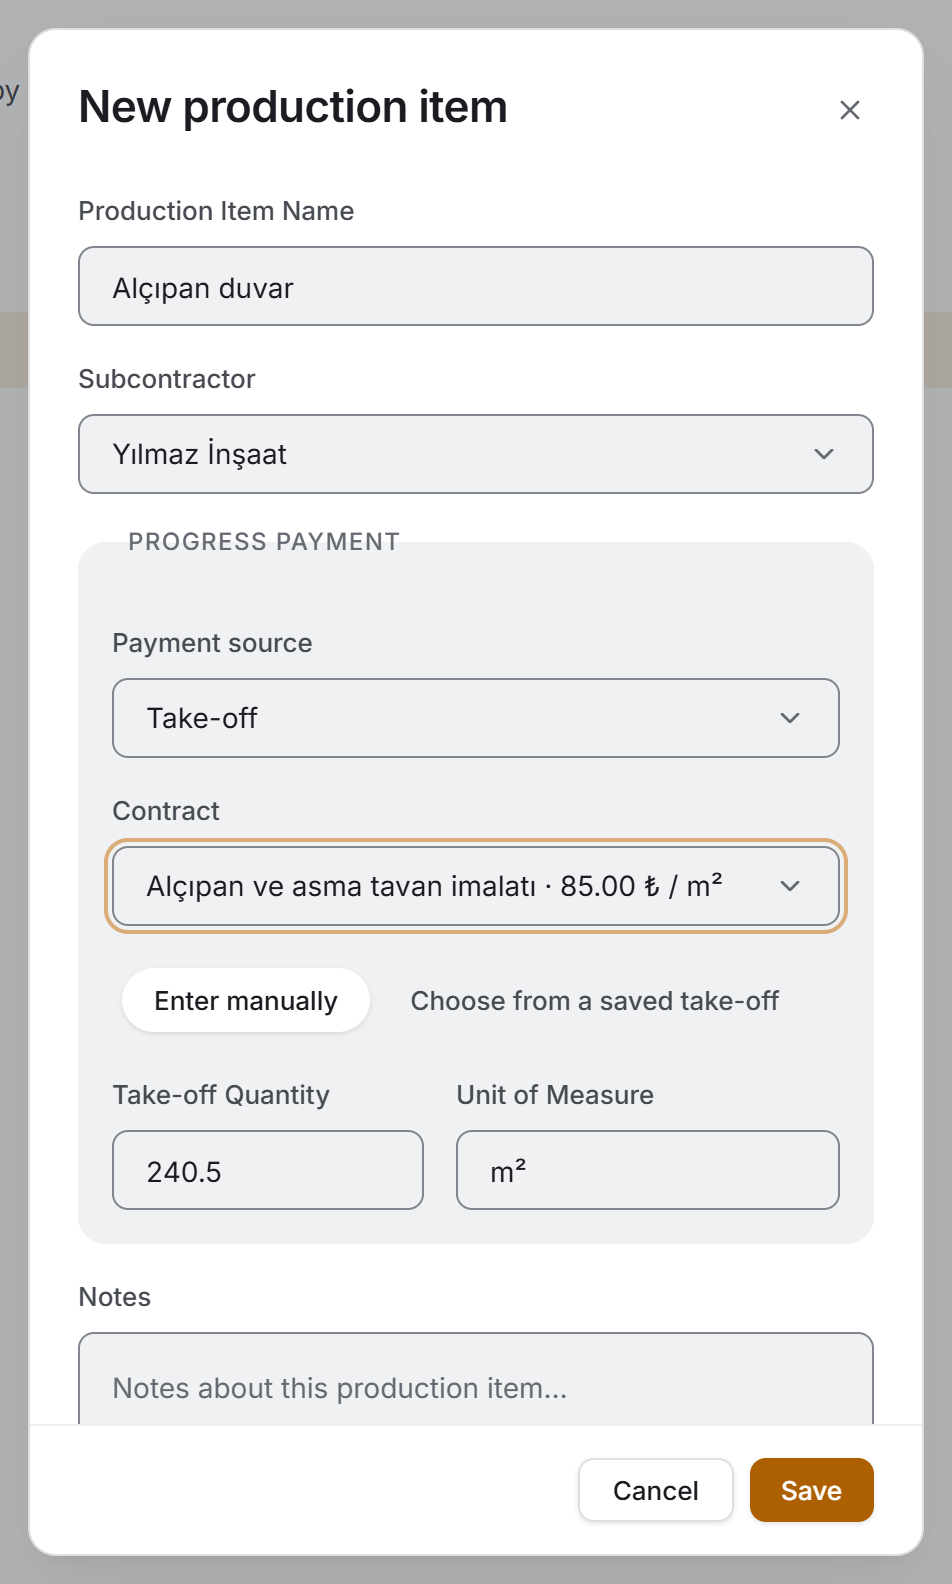
- Choose a room and press New production item.
- Type the Production Item Name. This is the only required field.
- Choose the Subcontractor if you need to.
- Choose the Payment source. If this is a work item that will not be billed, leave it as None / not applicable.
- If you chose a source, choose the Contract. The list shows only the agreements that belong to the chosen subcontractor and match the chosen source; each line carries the agreement's heading and its price.
- For a take-off or a day rate, enter the quantity.
- Type the Notes if there are any and press Save.
The production item is added to the end of the list with the Not done status.
5.7 Taking the quantity from a saved take-off
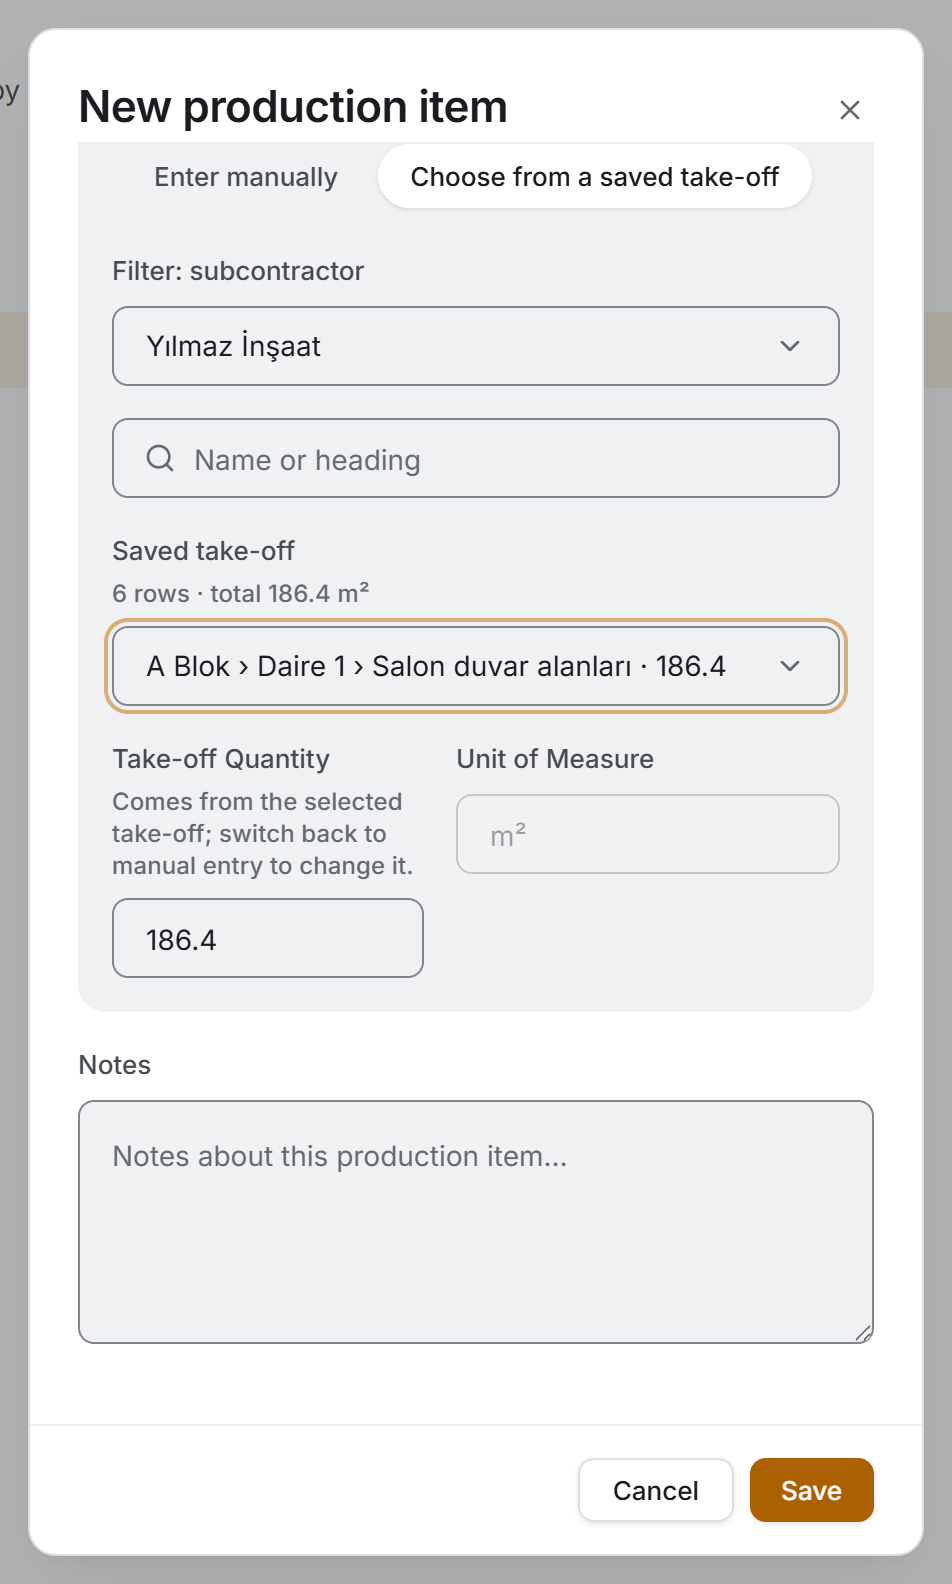
You can tie a take-off prepared in the Quantity Take-offs module to a production item; the quantity is not typed, it comes from the take-off.
- Choose Take-off as the Payment source.
- Move the Quantity source switch to Choose from a saved take-off.
- Narrow the list with Filter: subcontractor if you need to. The box lines itself up with the production item's subcontractor.
- Type the take-off's name or heading into the Search take-offs box.
- Choose the take-off from the Saved take-off box.
The quantity and the unit come from the take-off and are locked. Above the box the take-off's summary is written: how many rows and what the total is. If you want to correct the quantity by hand, move the switch to Enter manually; the link is broken and the box opens.
5.8 Changing status
Press the status you want on the three-segment switch on the right of the card. The change appears immediately and is saved in the background; in a room with twenty production items you do not wait at every click. If saving fails, the card returns to its old status.
5.9 Editing and deleting a production item
- Right-click the card.
- Choose Edit or Delete.
The edit window opens with the saved values. If it is tied to a saved take-off, the take-off is shown but the quantity is not overwritten — a quantity you corrected by hand earlier is not crushed by the take-off's total the moment you open the window.
5.10 Deleting a block, unit or room
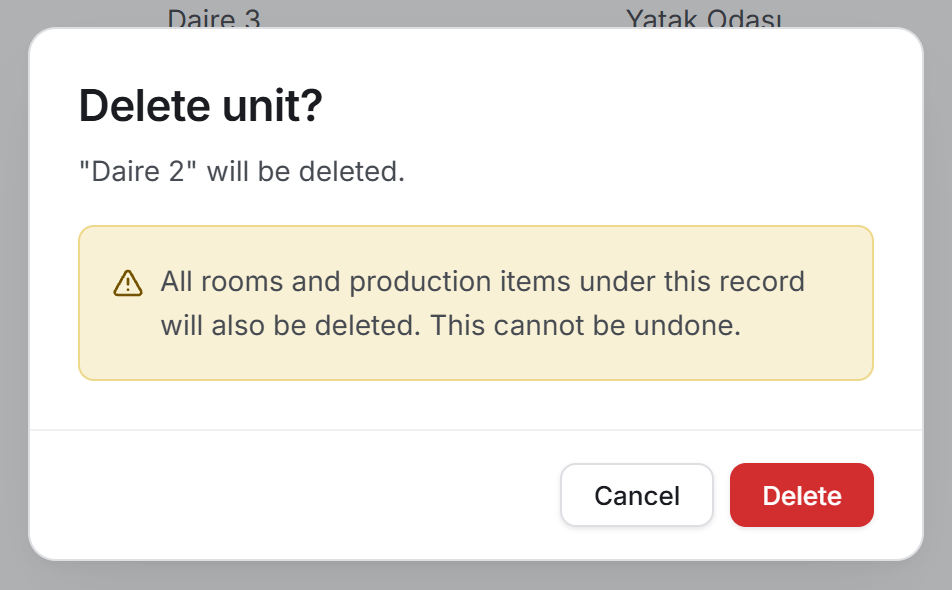
- Right-click the record and choose Delete.
- The window that opens says what will be deleted and carries a yellow warning below it.
- Press Delete.
Deletion goes from leaf to root: when you delete a unit, every room under it and every production item in those rooms are deleted too. The warning says so beforehand.
5.11 Collapsing the navigation
Collapse navigation hides the three columns on the left entirely and centres the production item area. It makes room while you work with long production item lists; the selected path stays on the trail. Press the same button to bring them back; it now reads Show navigation.
5.12 Entering production items in bulk from Excel
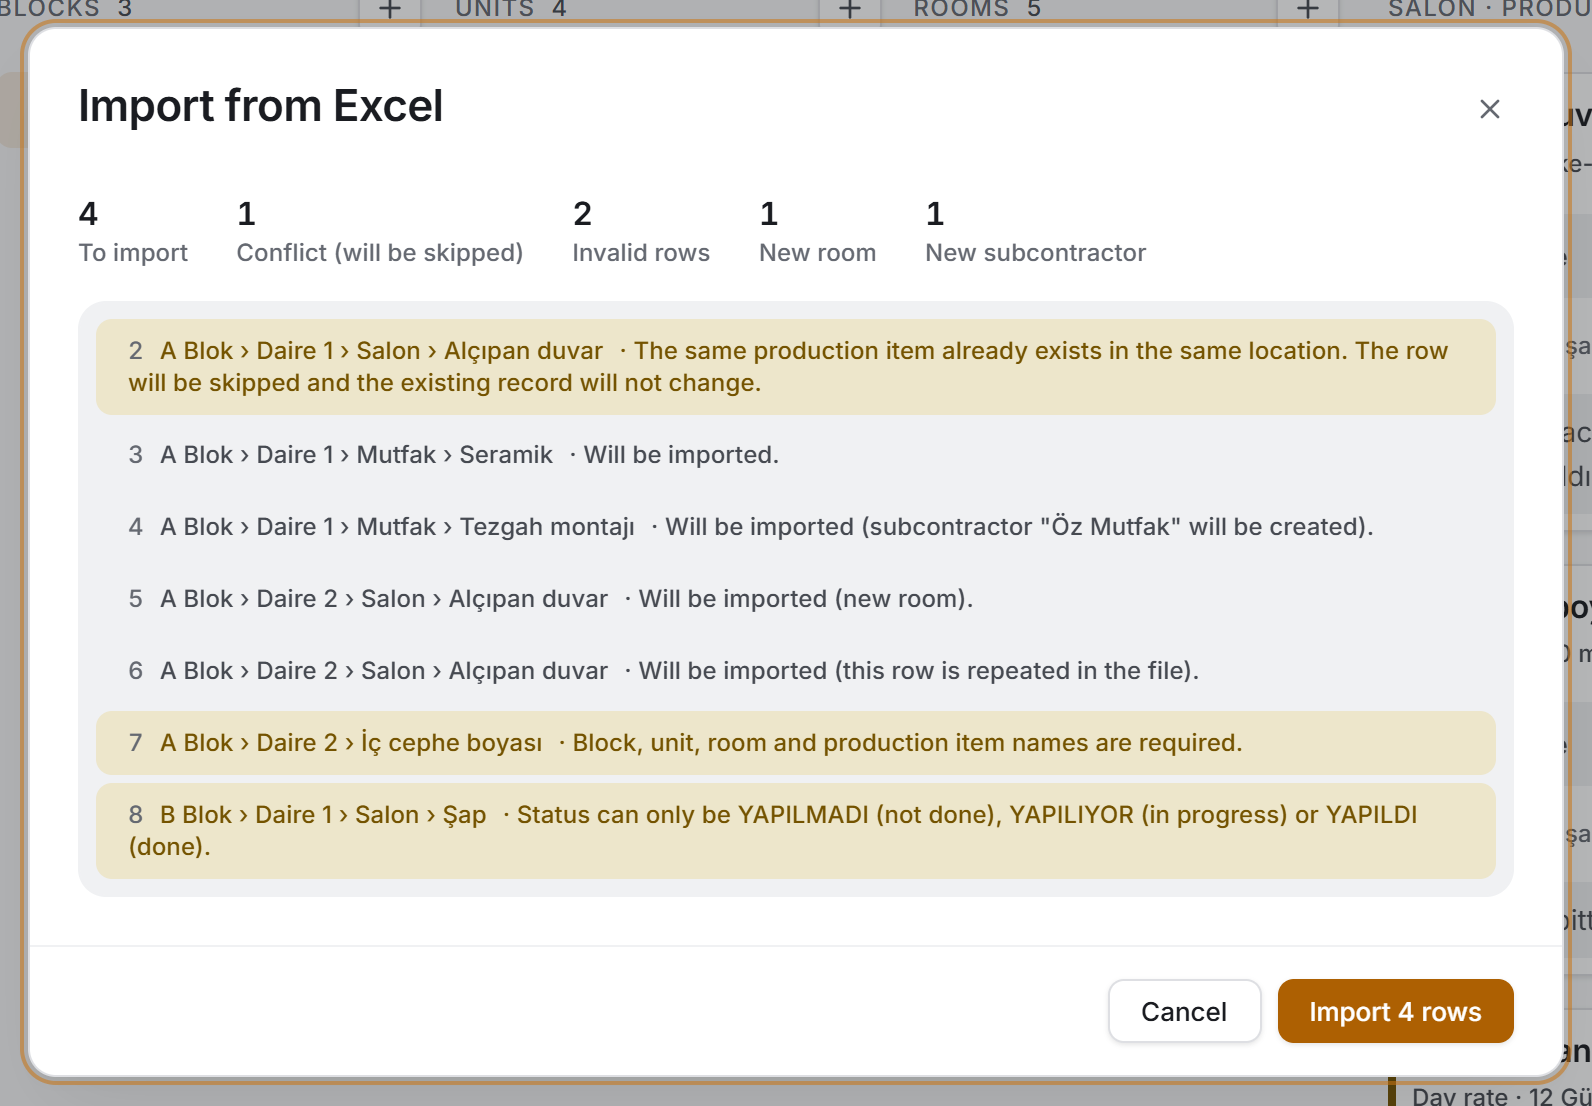
There are four steps and a gate in between: no record is created until you confirm.
- Press Import.
- Press Download template and choose where the file goes in the save window.
- Fill in the template in Excel (§6).
- Point at the file you filled in with Choose file.
- The app reads the file and compares it with the project's existing records.
- Read the figures and the row-by-row results on the preview screen.
- If it looks right, press Import {n} rows.
Counters sit above the preview and only those greater than zero are drawn:
| Counter | What it means |
|---|---|
| To import | The number of rows that will be written |
| Conflict (will be skipped) | A production item with the same name already exists in the same location. The row is skipped and the existing record does not change |
| Invalid rows | Rows with a required field missing or an unrecognised status |
| New block / unit / room | Levels that appear in the file and not in the project. They are created during the import |
| New subcontractor | Companies named in the file that are not registered in the project. They are created automatically |
In the list below it, every row is written with its own number, its path and its result. Rows on a yellow background are the ones that will not be written.
A progress bar appears while writing and you are asked not to close the window. When it is done a summary is given: how many production items were imported, how many new subcontractors were created, how many rows were skipped and, if any, how many rows could not be written.
6. Exports
The only file this screen produces is the import template. For reports, see the Production Report section.
Import › Download template produces an Excel workbook and opens the save window. The suggested name is sitabula-production-template.xlsx. The file comes down with the headings of whichever language you are using the app in.
The workbook has two sheets.
The Production items sheet has seven columns and their order is fixed:
| Column | What goes in it |
|---|---|
| Block Name | Required |
| Unit Name | Required |
| Room Name | Required |
| Production Item Name | Required |
| Subcontractor | Optional. Created if not registered in the project |
| Status | YAPILMADI, YAPILIYOR or YAPILDI. If left empty it counts as YAPILMADI |
| Note | Optional free text |
The sheet comes with three sample rows; delete them before entering your own data. The Status column has a drop-down list attached to it, so Excel itself stops you from typing an invalid status.
The Instructions sheet holds a seven-point summary of the same rules.
7. Things worth knowing
Three conditions must hold together for a production item to reach a progress payment: its status must be Done, a payment source must be chosen, and it must not already be in another progress payment. If one of the three is missing, the production item does not appear in the subcontractor's list of billable items. This is the most common reason why work the site calls finished does not show up in a progress payment.
A production item that is already in a progress payment can still be edited and deleted on this screen. The card carries the Billed badge but editing is not locked. Changing the quantity does not change the amount of a progress payment that was already created; from that moment the two records no longer agree. If such a correction is needed, remove the production item from that progress payment first.
A status change appears immediately and the save goes behind it. If the connection drops, the card returns to its old status. If you have marked twenty items in a row in a room and are not sure of the connection, read the list from the server once more with Refresh.
Deleting cannot be undone and spreads downwards. Deleting a block deletes every unit, room and production item under it. The confirmation window says so beforehand.
Progress percentages count production items, not quantities or amounts. Writing a single "Structural work" item in a room and writing ten items give different percentages on the project card. The more detailed your breakdown, the more realistic the progress.
All three levels are required. A production item cannot be tied straight to a block or a unit; it always sits under a room. Where there is no room division, opening a single room (for example Genel) and collecting the items there is a common solution.
"A blok" and "A Blok" are the same block. When names are compared during an import, extra spaces and upper/lower case differences are ignored. Without that, every typing difference pasted from Excel would produce a new block.
Photos are only displayed. Site photos are uploaded from the mobile app; the Windows version cannot add a photo, it can only open one that has been added.
The order is yours and it is the same for everyone. The order you drag into place is written to the server; you cannot sort the lists just for yourself.
Temporary accounts have a limit on the number of levels. In one project you can open at most one block, one unit and two rooms; when the limit is reached, an information window opens instead of the add window. The same limit applies to imports, and if the file exceeds it the import button is disabled.
8. Related sections
- Projects — the progress percentage on the card is counted from the production items on this screen.
- Overview — Site Flow and the completion ratio read the records here.
- Quantity Take-offs — the take-offs in the "Choose from a saved take-off" box are prepared there.
- Subcontractors — the contract list and the unit prices come from there; new companies created during an import land there too.
- Progress Payments — production items marked Done and tied to a contract appear there as billable items.
- Production Report — the summary of the records on this screen, broken down by block, unit, room and subcontractor.
- Production Planning — plans are tied to the production items here; changing a production item's subcontractor also updates the subcontractor of the plan tied to it.
- Users — who can see this page and who can edit it is decided there.